![]() Drop position is valid
Drop position is valid
![]() Drop position is invalid
Drop position is invalid
Adding a Meter to a Control Panel
Adding a Control Interface to a Control Panel
Move/Copy Meters and Curves Between Panels/Frames
Loading Projects and/or Workspaces
Drag and drop functionality greatly improves the efficiency of project design – especially the construction of online plots and controls. Drag and drop may be performed directly on the Schematic canvas, or definitions may be instantiated by drag and drop from the workspace window.
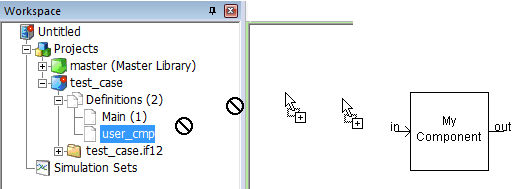
The drag and drop feature uses mouse pointer icons to indicate whether or not a dragged object may be placed under the current mouse position:
![]() Drop position is valid
Drop position is valid
![]() Drop position is invalid
Drop position is invalid
Component instances can be created directly from the corresponding definition in the workspace.
Navigate to the definitions list in the workspace secondary window.
Depress the Ctrl key and select and hold the desired component definition with the left mouse button.
Drag the mouse pointer to a blank area on the Schematic canvas and release the button to drop.
|
Drag and Drop onto Schematic Canvas from Workspace |
All component instances appearing on the Schematic canvas may be copied and pasted using drag and drop.
Hold down the Ctrl key.
Move the mouse pointer over the component instance to be copied.
Select and hold with your left mouse button.
Drag the mouse pointer to a blank area of the Schematic canvas and release the mouse button to paste.
|
Copying a Component Instance |
Curves can be added directly to graphs using drag and drop.
Hold down the Ctrl key (or use either the Ctrl or Shift key if the Controls and Curve Creation option is set to Use shift key to create in the Application Options dialog).
Move the mouse pointer over the desired Output Channel component instance.
Select and hold with your left mouse button.
Drag the mouse pointer to the desired graph and release the mouse button to paste.
|
Adding a Curve to a Graph from a Output Channel |
Meters can be added directly to control panels using drag and drop.
Hold down the Ctrl key (use the Shift key if the Controls and Curve Creation option is set to Use shift key to create in the Application Options dialog).
Move the mouse pointer over the desired Output Channel component instance.
Select and hold with your left mouse button.
Drag the mouse pointer over the desired control panel title bar and release the mouse button to paste.
|
Adding a Meter to a Control Panel from a Output Channel |
Control interfaces can be added directly to control panels using drag and drop.
Hold down the Ctrl key (use the Shift key if the Controls and Curve Creation option is set to Use shift key to create in the Application Options dialog).
Move the mouse pointer over the desired control component instance.
Select and hold with your left mouse button.
Drag the mouse pointer over the desired control panel title bar and release the mouse button to paste.
|
Adding a Control Interface to a Control Panel from a Output Channel |
Once a curve or meter interface has been placed in a graph or control panel, it may then be copied or moved as follows:
A curve may be copied within the same graph, to another graph, or to a panel.
A meter interface may be copied within the same panel, to another panel, or to a graph.
A curve may be moved within the same graph or to another graph.
A meter interface may be moved within the same panel or to another panel.
To copy a curve/meter interface, hold down the Ctrl key and then left-click and hold the object, drag and drop as described above.
To move a curve/meter interface, left-click and hold the object, drag and drop as described above.
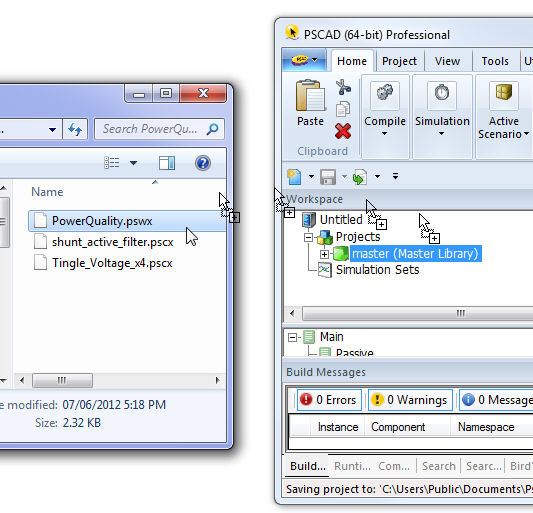
Both library and case projects, or entire workspaces, may be loaded directly into PSCAD via drag and drop. For example, open PSCAD and File Explorer:
|
Loading a Workspace from File Explorer |
To load a project or workspace, left-click and hold, drag and drop as described above.