Loading PSCAD V3 projects into PSCAD V4 is fairly straightforward, and for the most part will be accomplished without incident. Simply load the V3 case or library project exactly as you would a V4 project.
As is normal when software is updated, there are changes made to existing features, which may or may not affect your case. There are a few important issues to be aware of before starting to use your V3 projects in PSCAD V4. These are described in the following sections.
Components used in the EMTDC System Dynamics (i.e. CSMF components, modules, etc.) are automatically ordered in V4 with a sophisticated new sequencing algorithm. In PSCAD V3, these types of components were ordered using a simpler method.
This important feature should be considered when initially verifying your V3 project results in PSCAD V4. The new sequencing algorithm may adjust the order in which components appear in the Fortran code. Depending on where the components within the EMTDC System Dynamics (i.e. DSDYN or DSOUT), a single time step delay may be added or removed in comparison with V3 results.
If this does indeed occur in your case, PSCAD V4 allows you to manually adjust the component sequence. Please see the topic entitled Component Ordering for more details.
In PSCAD V3, additional library and object file paths entered in the Additonal .obj and .lib Files field in the Project Settings dialog, were relative to the respective temporary (*.emt) directory for the project. In PSCAD V4, these paths are now relative to the User Library Path (set in the Workspace Settings dialog window), or can be entered directly as absolute paths.
These paths must be changed accordingly in your V4 projects. Open the respective Project Settings dialog for the project (right-click on the project filename in the Workspace and select Project Settings...) and select the Link tab. Modify the paths in the Additional Fortran Library (*.lib) and Object (*.obj) Files input field. For example, a V3 reference is shown below:
would appear as follows in PSCAD V4:

A new feature was added to PSCAD V4, which optimizes variable storage between time steps during a simulation. Unfortunately, when this optimization algorithm is enabled, it also disables Flyby window functionality. To enable Flyby windows while debugging your project, the optimize storage feature must be turned off.
Right-click on the project filename in the Workspace window select Project Settings.... Click the Dynamics tab and select the option called Store Feed-Forward Signals for Viewing.
The output format of the Node Loop component was altered to reflect changes made to the subsystem splitting algorithm in PSCAD V4. This becomes important if your PSCAD V3 user components utilize the Node Loop for input. If this is the case, then you must alter your components before running any V4 projects.
In PSCAD V3, the subsystem global variable (SS) always retained the same value within the same circuit module. In PSCAD V4, the components on a single circuit can reside in different subsystems. As such, a new Loop prefix has been added to tell the compiler to use the subsystem number of the Node Loop component when processing:
V3 format (single subsystem):
$SS, $Loop:NA, $Loop:NB, $Loop:NC
|
V4 format (multi-subsystem):
$Loop:SS, $Loop:NA, $Loop:NB, $Loop:NC
|
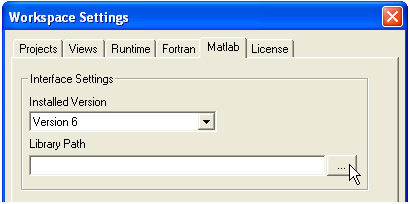
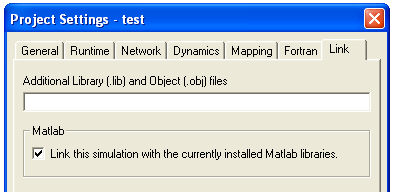
Project and Workspace settings should be adjusted slightly when migrated V3 projects that used the MATLAB interface. Please perform the following adjustments:
Open the respective Project Settings dialog for the project (right-click on the project filename in the Workspace window and select Project Settings...) and select the Link tab. Delete all of the MATLAB installation library paths in the Additional Library (*.lib) and Object (*.obj) Files input field. Ensure that the Link this Simulation with the Currently Installed Matlab Libraries check box is selected.
Open the Workspace Settings dialog by selecting Edit | Workspace Settings... and click the Matlab tab. In the Interface Settings area, select the Installed Version and Library Path to the MATLAB installation libraries.