
The ribbon control bar provides easy accessibility to most features and components in PSCAD. Included with the ribbon is an inherent quick access bar, which is customizable for placement of favoured and well used button actions. The ribbon control bar is featured prominently across the top of the application environment.
The File tab includes functions related to project file organization and manipulation, including standard buttons for creating new files, saving, opening, etc.

File Tab Option Bar
Click New on the option bar to open this menu. See Creating a New Workspace or Creating a New Project for more details on these functions.
Icon |
Description
|
|
Creates a new case project (double-click). |
|
Creates a new library project (double-click). |
|
Creates a new workspace (double-click). |
|
Alternate way to create a new file. Select one of the three icons above (single-click), then click this button. |
|
The default name for the new file. Modify this name, if desired, before you create the file (of course, you can change it later by saving it as a new file). |
|
The default folder to create the new file. Modify this path, if desired, before you create the file. |
|
Browse button. Used to modify the folder path. |
Click Open on the option bar to open this menu.
Icon |
Description
|
|
Open: Invokes the Open File dialog. See Opening a Workspace or Opening a Project. |
|
Examples: Invokes the Open File dialog, directly to the Examples Folder, which contains example projects released with the software. See Opening a Workspace or Opening a Project. |
|
Import: Invokes the Open File dialog, specifically for the older *.psc and *.psl project file formats. See Importing a Project. |
|
My Projects: Invokes the Open File dialog, directly to the My Projects folder. This folder path is set via the My Projects application option. See the Workspace category of the Application Options dialog. |
|
This area keeps track of workspace and project files that have been opened recently. |
A simple save action. Clicking Save will save whichever file was selected in the workspace, prior to entering the File tab. See Saving a Workspace or Saving a Project.
Click Save As on the option bar to open this menu. See Saving a Workspace or Saving a Project for more details on these functions.
Button |
Description
|
|
Save All: Saves all workspace and project files. |
|
Save Project: Saves changes to the project (*.pscx or *.pslx file) currently in focus. |
|
Save Project As...: Invokes the Save Project As dialog for the project (*.pscx or *.pslx file) currently in focus. |
|
Save Project As (Version X4): Invokes the Save Project As dialog for the project currently in focus, but set specifically to PSCAD v4.6 format. See Save Project As... PSCAD v4.6 Format for details on potential pitfalls. |
|
Save Workspace: Saves changes to the workspace (*.pswx file. |
|
Save Workspace As...: Invokes the Save Workspace As dialog. |
A simple unload action. Clicking Unload will unload whichever file was selected in the workspace, prior to entering the File tab. See Unloading a Project.
Click on Print to bring up the standard print page.
Clicking Help will open a table of help options. Double-click any of these options to open the Application Help.

Clicking Application Options will invoke the Application Options dialog. See Application, Project and Licensing Options for more details.
Clicking the Exit option will close the PSCAD application.
The buttons in this tab consist of the most commonly used features. Some of the less straightforward buttons are described below:
Button |
Description
|
|
Compile (build) entire project. |
|
Compile (build) modified modules. See Compiling and Building a Project. |
|
Clean the temporary folder. |
|
Run simulation. See Running a Single-Project Simulation. |
|
Stop simulation. See Stopping a Simulation. |
|
Pause simulation. See Pausing a Simulation. |
|
Skip simulation. See Skipping a Simulation. |
|
Advance run by one time step (while pause is invoked). |
|
Take a snapshot. |
|
Slow the simulation pace. See Pacing a Simulation. |
|
Change plot step. |
|
Save scenario. See Scenarios (Control Templates). |
|
Delete scenario. |
|
View scenario. |
|
Scenarios template list. |
|
Navigate backward. |
|
Navigate up to parent schematic instance. |
|
Navigate forward. |
|
Undo. |
|
Redo. |
|
Select mode (includes Select All, as well as Freehand and Polygon select modes) |
|
|
|
Launch the search pane. |
|
Invoke wire mode. |
|
Zoom in one step. See Zoom. |
|
Zoom out one step. |
|
Zoom control list box |
|
Zoom extents |
|
Zoom rectangle |
The project tab simply contains an assortment of fields and buttons that allow for easy access to the project settings options.

The view tab contains an assortment of buttons, drop lists and check boxes that are mainly for canvas view control, as well as easy access to the modules canvas settings options.

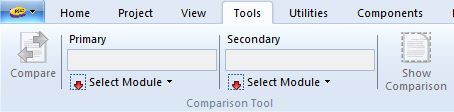
The tools tab provides a place to house button for features inherent to PSCAD. As of PSCAD v4.6.0, the only controls here are that for the Comparison Tool.
Button |
Description
|
|
Medic: Use this utility to help diagnose and correct installation settings. Contact the support desk for help. |
|
License Keys. Use this button to launch the Licence Update utility (used to enter or upgrade license keys). |
|
|
|
CLS: This button will launch the Cluster Launch System (CLS). |
|
PSOUT Reader: This button launches a utility used to read and manipulate the binary EMTDC output file format (*.psout). See PSOUT File Reader for more details. |
The utilities tab provides easy access to utility programs used that complement PSCAD.
Button |
Description
|
|
Fortran Medic. Use this utility to help diagnose and correct installation settings. Contact the support desk for help. |
|
License Keys. Use this button to launch the Licence Update utility (used to enter or upgrade license keys). |
The components tab provides easy access to the most commonly used components in PSCAD.

The models tab provides easy access to all components in the master library. The components are sorted into the same categories as they are graphically represented in the master library main page. Simply click on any of the icons to get a list of components. The component graphic is displayed in a flyby window for ease in selection.

NOTE: This tab is visible only when viewing the Schematic tab.
The t-lines tab is specific to overhead transmission lines only.

NOTE: This tab is visible only when editing transmission line definitions.
The cables tab is specific to underground cables only.

NOTE: This tab is visible only when editing cable definitions.
The shapes tab deals with graphical objects in the Graphics section of The Definition Editor.

NOTE: This tab is visible only when viewing the Graphic, Parameters or Script tabs.
The filtering tab contains functions dealing with graphical layers.

NOTE: This tab is visible only when viewing the Graphic, Parameters or Script tabs.
The script tab is used only when viewing component Script.

NOTE: This tab is visible only when viewing the Graphic, Parameters or Script tabs.
If more canvas space is desired for viewing your circuit, you can minimize or maximize the ribbon by simply pressing the down/up arrow in the top-right corner.
![]()
Or, right-click on the ribbon and select Minimize the Ribbon.
The ribbon control bar comes complete with a customizable button bar called the Quick Access Bar. Any function that is defined within the ribbon control bar can be added to this bar for quick access.

To add a button to the quick access bar, right-click on the bar and select Customize Quick Access Toolbar.... This will bring up the Customize dialog:

Click the Add or Remove buttons to add or remove selected commands.


